GitHub Workflow
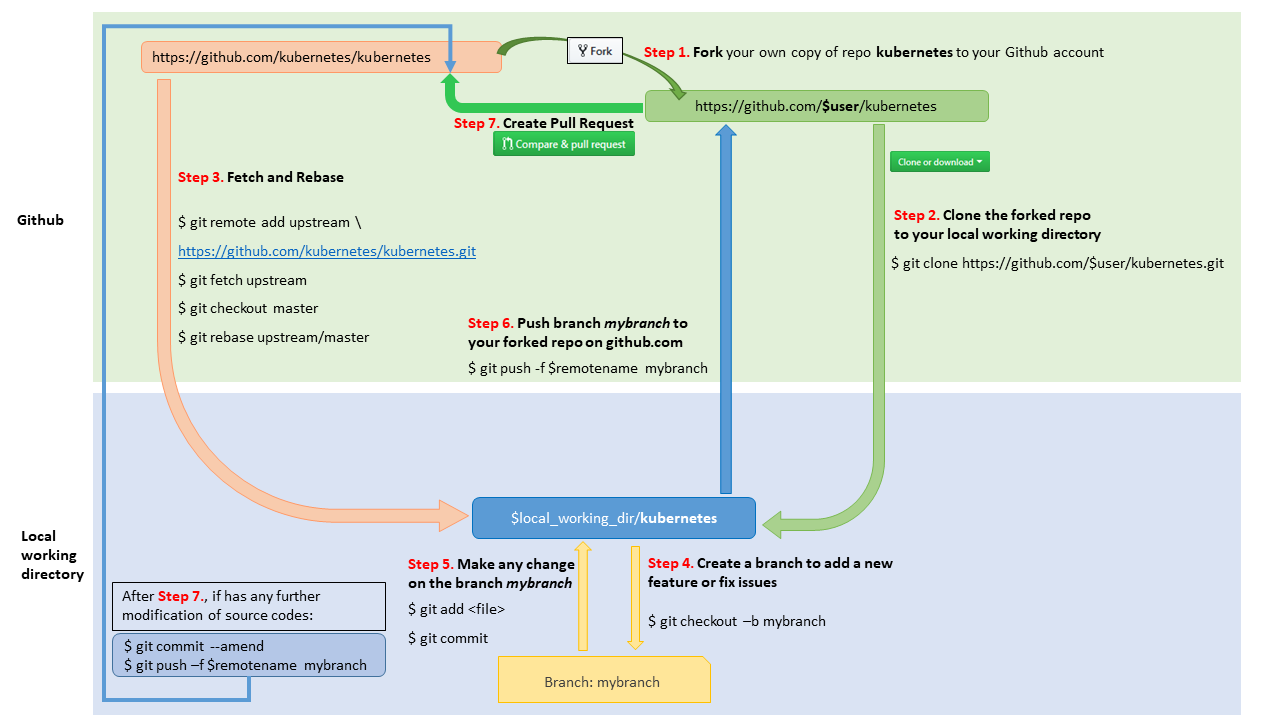
1. Fork in the cloud
- Visit https://github.com/kubernetes/kubernetes
- Click
Forkbutton (top right) to establish a cloud-based fork.
2. Clone fork to local storage
In your shell, define a local working directory as working_dir.
export working_dir="${HOME}/src/k8s.io" # Change to your preferred location for source code
Set user to match your github profile name:
export user=<your github profile name>
Both $working_dir and $user are mentioned in the figure above.
Create your clone:
mkdir -p $working_dir
cd $working_dir
git clone https://github.com/$user/kubernetes.git
# or: git clone git@github.com:$user/kubernetes.git

cd $working_dir/kubernetes
git remote add upstream https://github.com/kubernetes/kubernetes.git
# or: git remote add upstream git@github.com:kubernetes/kubernetes.git

# Never push to upstream master
git remote set-url --push upstream no_push

# Confirm that your remotes make sense:
git remote -v
3. Create a Working Branch
Get your local master up to date. Note that depending on which repository you are working from, the default branch may be called “main” instead of “master”.
cd $working_dir/kubernetes
git fetch upstream
git checkout master
git rebase upstream/master
Create your new branch.
git checkout -b myfeature
You may now edit files on the myfeature branch.
Building Kubernetes
This workflow is process-specific. For quick-start build instructions for kubernetes/kubernetes , please see here .
4. Keep your branch in sync
You will need to periodically fetch changes from the upstream
repository to keep your working branch in sync. Note that depending on which repository you are working from,
the default branch may be called ‘main’ instead of ‘master’.
Make sure your local repository is on your working branch and run the following commands to keep it in sync:
git fetch upstream
git rebase upstream/master
Please don’t use git pull instead of the above fetch and
rebase. Since git pull executes a merge, it creates merge commits. These make the commit history messy
and violate the principle that commits ought to be individually understandable
and useful (see below).
You might also consider changing your .git/config file via
git config branch.autoSetupRebase always to change the behavior of git pull, or another non-merge option such as git pull --rebase.
5. Commit Your Changes
You will probably want to regularly commit your changes. It is likely that you will go back and edit, build, and test multiple times. After a few cycles of this, you might amend your previous commit .
git commit
6. Push to GitHub
When your changes are ready for review, push your working branch to your fork on GitHub.
git push -f <your_remote_name> myfeature
7. Create a Pull Request
- Visit your fork at
https://github.com/<user>/kubernetes - Click the Compare & Pull Request button next to your
myfeaturebranch. - Check out the pull request process for more details and advice.
If you have upstream write access, please refrain from using the GitHub UI for creating PRs, because GitHub will create the PR branch inside the main repository rather than inside your fork.
Get a code review
Once your pull request has been opened it will be assigned to one or more reviewers. Those reviewers will do a thorough code review, looking for correctness, bugs, opportunities for improvement, documentation and comments, and style.
Commit changes made in response to review comments to the same branch on your fork.
Very small PRs are easy to review. Very large PRs are very difficult to review.
Squash commits
After a review, prepare your PR for merging by squashing your commits.
All commits left on your branch after a review should represent meaningful milestones or units of work. Use commits to add clarity to the development and review process.
Before merging a PR, squash the following kinds of commits:
- Fixes/review feedback
- Typos
- Merges and rebases
- Work in progress
Aim to have every commit in a PR compile and pass tests independently if you can, but it’s not a requirement. In particular, merge commits must be removed, as they will not pass tests.
To squash your commits, perform an interactive rebase :
- Check your git branch:
git status
The output should be similar to this:
On branch your-contribution
Your branch is up to date with 'origin/your-contribution'.
- Start an interactive rebase using a specific commit hash, or count backwards from your last commit using
HEAD~<n>, where<n>represents the number of commits to include in the rebase.
git rebase -i HEAD~3
The output should be similar to this:
pick 2ebe926 Original commit
pick 31f33e9 Address feedback
pick b0315fe Second unit of work

# Rebase 7c34fc9..b0315ff onto 7c34fc9 (3 commands)
#
# Commands:
# p, pick <commit> = use commit
# r, reword <commit> = use commit, but edit the commit message
# e, edit <commit> = use commit, but stop for amending
# s, squash <commit> = use commit, but meld into previous commit
# f, fixup <commit> = like "squash", but discard this commit's log message

...
- Use a command line text editor to change the word
picktosquashfor the commits you want to squash, then save your changes and continue the rebase:
pick 2ebe926 Original commit
squash 31f33e9 Address feedback
pick b0315fe Second unit of work

...
The output after saving changes should look similar to this:
[detached HEAD 61fdded] Second unit of work
 Date: Thu Mar 5 19:01:32 2020 +0100
 2 files changed, 15 insertions(+), 1 deletion(-)

 ...

Successfully rebased and updated refs/heads/master.
- Force push your changes to your remote branch:
git push --force-with-lease
For mass automated fixups such as automated doc formatting, use one or more commits for the changes to tooling and a final commit to apply the fixup en masse. This makes reviews easier.
An alternative to this manual squashing process is to use the Prow and Tide based automation that is configured in GitHub: adding a comment to your PR with /label tide/merge-method-squash will trigger the automation so that GitHub squash your commits onto the target branch once the PR is approved. Using this approach simplifies things for those less familiar with Git, but there are situations in where it’s better to squash locally; reviewers will have this in mind and can ask for manual squashing to be done.
By squashing locally, you control the commit message(s) for your work, and can separate a large PR into logically separate changes. For example: you have a pull request that is code complete and has 24 commits. You rebase this against the same merge base, simplifying the change to two commits. Each of those two commits represents a single logical change and each commit message summarizes what changes. Reviewers see that the set of changes are now understandable, and approve your PR.
Merging a commit
Once you’ve received review and approval, your commits are squashed, your PR is ready for merging.
Merging happens automatically after both a Reviewer and Approver have approved the PR. If you haven’t squashed your commits, they may ask you to do so before approving a PR.
Reverting a commit
In case you wish to revert a commit, use the following instructions.
If you have upstream write access, please refrain from using the
Revert button in the GitHub UI for creating the PR, because GitHub
will create the PR branch inside the main repository rather than inside your fork.
Create a branch and sync it with upstream. Note that depending on which repository you are working from, the default branch may be called ‘main’ instead of ‘master’.
# create a branch
git checkout -b myrevert

# sync the branch with upstream
git fetch upstream
git rebase upstream/master
If the commit you wish to revert is a merge commit, use this command:
# SHA is the hash of the merge commit you wish to revert
git revert -m 1 <SHA>
If it is a single commit, use this command:
# SHA is the hash of the single commit you wish to revert
git revert <SHA>
This will create a new commit reverting the changes. Push this new commit to your remote.
git push <your_remote_name> myrevertFinally, create a Pull Request using this branch.
Feedback
Was this page helpful?